Welcome to this special depth of field edition of Art of Eorzea! Today we will be covering depth of field photography principles, the Final Fantasy XIV Group Pose depth of field settings and (almost!) the entire list of the ReShade DoF settings. This is a very long article and so I would urge you to use the index below if you are here looking for specific information, alternatively you can search the page using ‘Ctrl & F’. Each of the ReShade DoF settings have been listed exactly as they are written in ReShade to make searching this article easier.
For those who have not read this column before, Art of Eorzea is the sister column to Echoes of Eorzea and is a series primarily of screenshot photography and art based articles which begin to introduce the technical and practical aspects of photography when combined with in-game screenshots and screenshot art. The first in this series ‘Art of Eorzea: FFXIV Screenshot Basics‘ briefly covers a range of principles which are to be elaborated upon in subsequent editions, such as color theory, framing, and of course depth of field.
This article is a huge undertaking for me, especially the ReShade settings section as there are so many variables and options involved, it’s almost impossible to visually represent all of the capabilities of the program. I sincerely apologize in advance if I have made any mistakes. I will be reviewing this article frequently to make additions and alterations if necessary.
For those who are familiar with all the photographic principles, please forgive me but I feel it’s only right to go over them in more detail for this guide even though they were briefly covered in the first ‘Screenshot Basics’ article. Feel free to skip ahead!
Index
Depth of Field Explained
FFXIV GPose DoF Settings
ReShade DoF Settings
ReShade: Ring DoF
ReShade: Magic DoF
ReShade: GP DoF
ReShade: Matso DoF
ReShade: Marty McFly DoF
Notes & Disclaimers
A general ReShade settings guide which explains most of the ReShade settings can be found here!
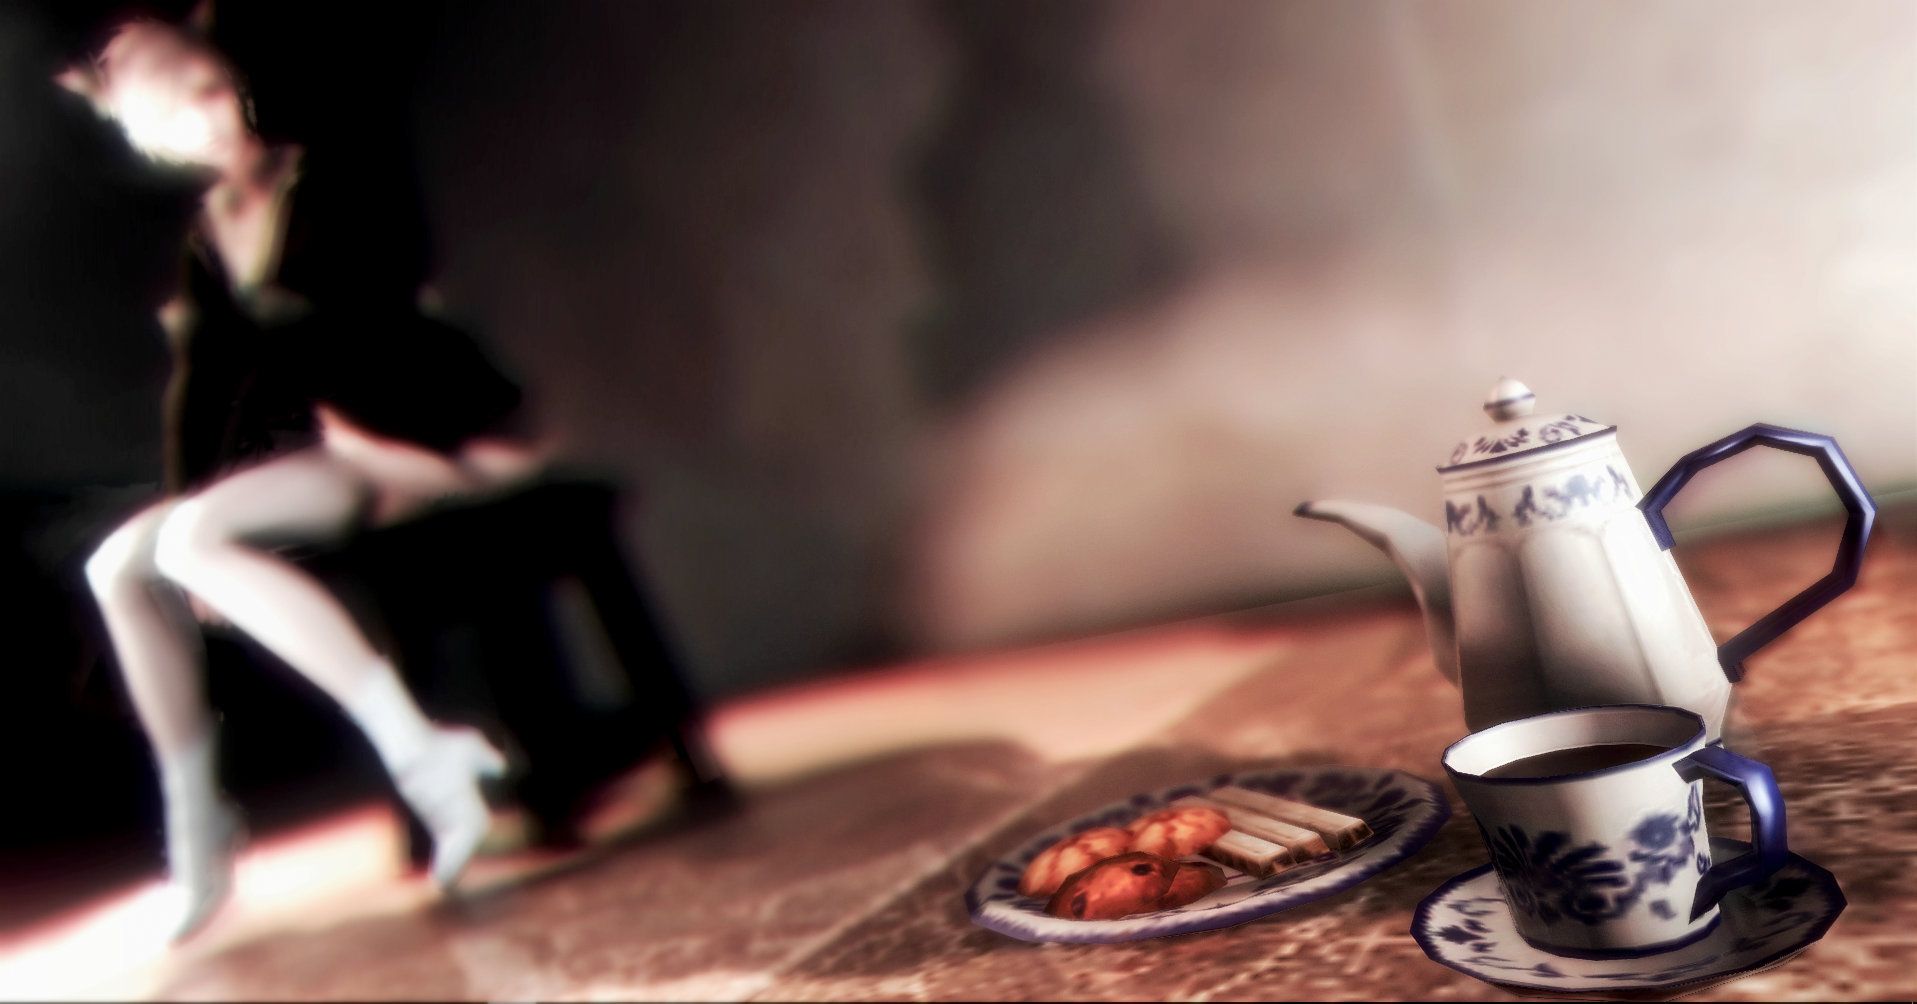
Note: For the majority of the images of the article I have created a purpose-built apartment room to display example settings used (the location is listed at the end of the article, feel free to visit or use the room). Ideally, I would have liked to use a wider landscape showing some of the beautiful locations in the game, however, with continual light and weather changes it proved too difficult to keep the images uniform.
Depth of Field Explained
In photographic terms, depth of field is used to highlight certain objects within an image or direct the viewer’s eye in a certain way. By definition, it is the area of an image that is sharp and clear when objects in the foreground or background remain blurry.
Types of Depth of field
Deep
The image is mostly entirely sharp, it can emphasize that all subjects in the image have relevance from foreground to background.

Medium
Objects in the foreground are in focus and being highlighted, while background details are blurred but still identifiable allowing the image to retain context and allowing the viewer to know that the secondary elements are still relevant to the whole image.
Shallow
Shallow depth of field is used to focus on one specific subject and highlight it. It can also turn a messy background into a wash of color or blur, allowing the focus of the image to be clear and prominent.

 What Creates Depth of field?
The zone of sharpness depends on three main factors; the aperture of the lens, the distance between the lens and subject, and the focal length of the lens. Also (this relates to ReShade setting “DOF_FOCUSPOINT”) the beginning and end of the zone of sharpness will be determined by where you choose to focus the lens.
1. Aperture
The measurement of the aperture is known as the f-number, the smaller the number, the larger the opening and vice versa. If you think of the human eye, if there is a large amount of light, the iris will be very small. So, a large aperture would be f/2.8, and a small aperture would be f/22.
F/2.8: Large aperture, large opening. Would indicate a shallow (blurred background) depth of field.
F/8: Medium aperture, medium opening. Would indicate subject and midground are in focus with the background blurred but still identifiable.
F/22: Small aperture, small opening. Would indicate a deep depth of field (sharper image in both foreground and background).
In Short:
Large aperture = Small f-number = Shallow (small) depth of field.
Small aperture = Larger f-number = Deeper (larger) depth of field.
2. Subject Distance
The closer your camera is to the subject the less depth of field you will have in your image and vice versa. This is something you can even use your smartphone to test out by focusing it on an object near to you, then focus it in the midground, then background. You should see a noticeable difference in blur surrounding the closest object (assuming your phone has autofocus).
3. Focal Length
The focal length of the lens determines how much it can see, and how magnified a subject appears in the frame. Shorter focal length lenses (<50mm) have a wider angle of view, so the subject takes up less of the frame than if it was shot at the same distance with a lens with a larger focal length (telephoto). Due to the image being magnified with longer focal length lenses, as too is the blur in the background so it appears as a more shallow depth of field. Shorter focal lengths offer a greater or more clear image from foreground to background.
4. Focal Point
The point at which you focus the lens will affect where the zone of sharpness will begin and end. The depth of field extends from about one third in front of the subject to two thirds behind.
Now, of course in Final Fantasy XIV we do not have a ‘real’ camera or lens to control, but I feel the theory behind this principle is important as it may help understand how the ReShade settings relate to real life photography.
FFXIV GPose DoF Settings
In the Group Pose tool (GPose) there is a built-in depth of field setting on the first tab.
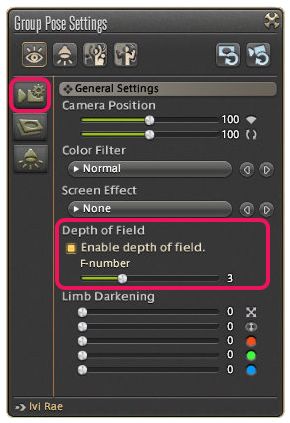
If the number is low (0), the objects in the close foreground will become slightly blurred or out of focus and objects. If the number is high, the setting will produce a large depth of field, meaning almost no blur.
You will want to use the GPose setting on a higher number if your character or object is very close to the ‘camera’.
The GPose depth of field setting, though a wonderful addition to the tool, is limited and produces a very subtle gaussian blur effect. In some circumstances, it may not appear to work at all depending on the emote and zoom that you choose for your image, as the axis for the camera, zoom value and emote placement can ‘confuse’ the value on the depth of field slider and result in subtle blurring of the whole image. The effect is applied on the basis of where the camera is physically sitting in-game, however, the zoom slider value only magnifies the image and does not move the camera’s placement.
The higher value, the more depth of field there is (greater clarity) and the lower end of the slider makes things more blurry.
If you want to see a clearer marker for how the depth of field settings are affecting your image, keep an eye on the ‘band’ of focus along the floor as you switch the slider from 0 to 10 (you’re more likely to be able to see this in a confined space such as an inn room or apartment).
ReShade DoF Settings
Below I will list the ReShade depth of field settings in turn along with their tooltip and a short description if applicable. Example screenshots will be provided for as many settings as possible to more easily identify what the setting is capable of. However, some settings work in conjunction with other settings and so 1-100 results could be produced (so I’ve chosen an image that most clearly represents the setting).
The ‘Reshade Basic Settings’ section lists the standard depth of field settings that apply for all shaders. Each shader has additional settings, which are listed separately below, but the settings will nearly always be on default to display the various effects each shader can produce. Not every setting can be elaborated on, as the tooltip may already contain enough information.
Please remember to disable GPose depth of field before changing the settings in ReShade, otherwise, it will apply its own blur in addition to that of ReShade.
Note: For this guide, I will be leaving MXAO OFF and trying to include my ReShade window in most screenshots so that a wider variety of settings can be viewed and checked.
Terms:
Bokeh
In photography, bokeh is the aesthetic quality of the blur produced in the out-of-focus parts of an image produced by a lens. Bokeh has been defined as “the way the lens renders out-of-focus points of light. (Source)
Chromatic Aberration
Chromatic aberration, also known as “color fringing” or “purple fringing”, is a common optical problem that occurs when a lens is either unable to bring all wavelengths of color to the same focal plane, and/or when wavelengths of color are focused at different positions in the focal plane. Chromatic aberration is caused by lens dispersion, with different colors of light traveling at different speeds while passing through a lens. As a result, the image can look blurred or noticeable colored edges (red, green, blue, yellow, purple, magenta) can appear around objects, especially in high-contrast situations. (Source)
LDR
Light Dependent Resistor: An LDR is a component that has a (variable) resistance that changes with the light intensity that falls upon it. (Source)
Basic ReShade Settings
Basic ReShade settings apply across the board to whichever depth of field shader you have toggled on.
Please, please back up all your .ini files before playing with any settings. I say this in every guide but it’s so very important.
Note: The first set of standard DoF setting shown here will be displayed using ‘MatsoDOF’ toggled on unless specified otherwise.
Note: Don’t be scared of the scary looking names for the settings (it’s been a reaction from anyone I’ve shown the settings list to!)
DOF_AUTOFOCUS
Tooltip: Enables automated focus recognition based on samples around the autofocus center.
Derives its autofocus target from DOF_FOCUSPOINT or MOUSEDRIVEN_AF. I would recommend that this is turned ON otherwise other settings will not work. This is a bit of a fiddly setting to use in conjunction with the focus point, so I would always opt for MOUSEDRIVEN_AF as that will give you the most control of subject focus (but keep this setting on even with mousedriven AF).
DOF_MOUSEDRIVEN_AF
Tooltip: Enables mouse-driven autofocus. The AF point is read from the mouse coordinates, otherwise, DOF_FOCUSPOINT is used.
The depth of field will focus where your mouse pointer is, works in conjunction with DOF_AUTOFOCUS. I would recommend that this is turned on unless you are creating a filter where you wish to manually set a constant depth of field focus area. Please make sure DOF_AUTOFOCUS dropdown is set to ON.
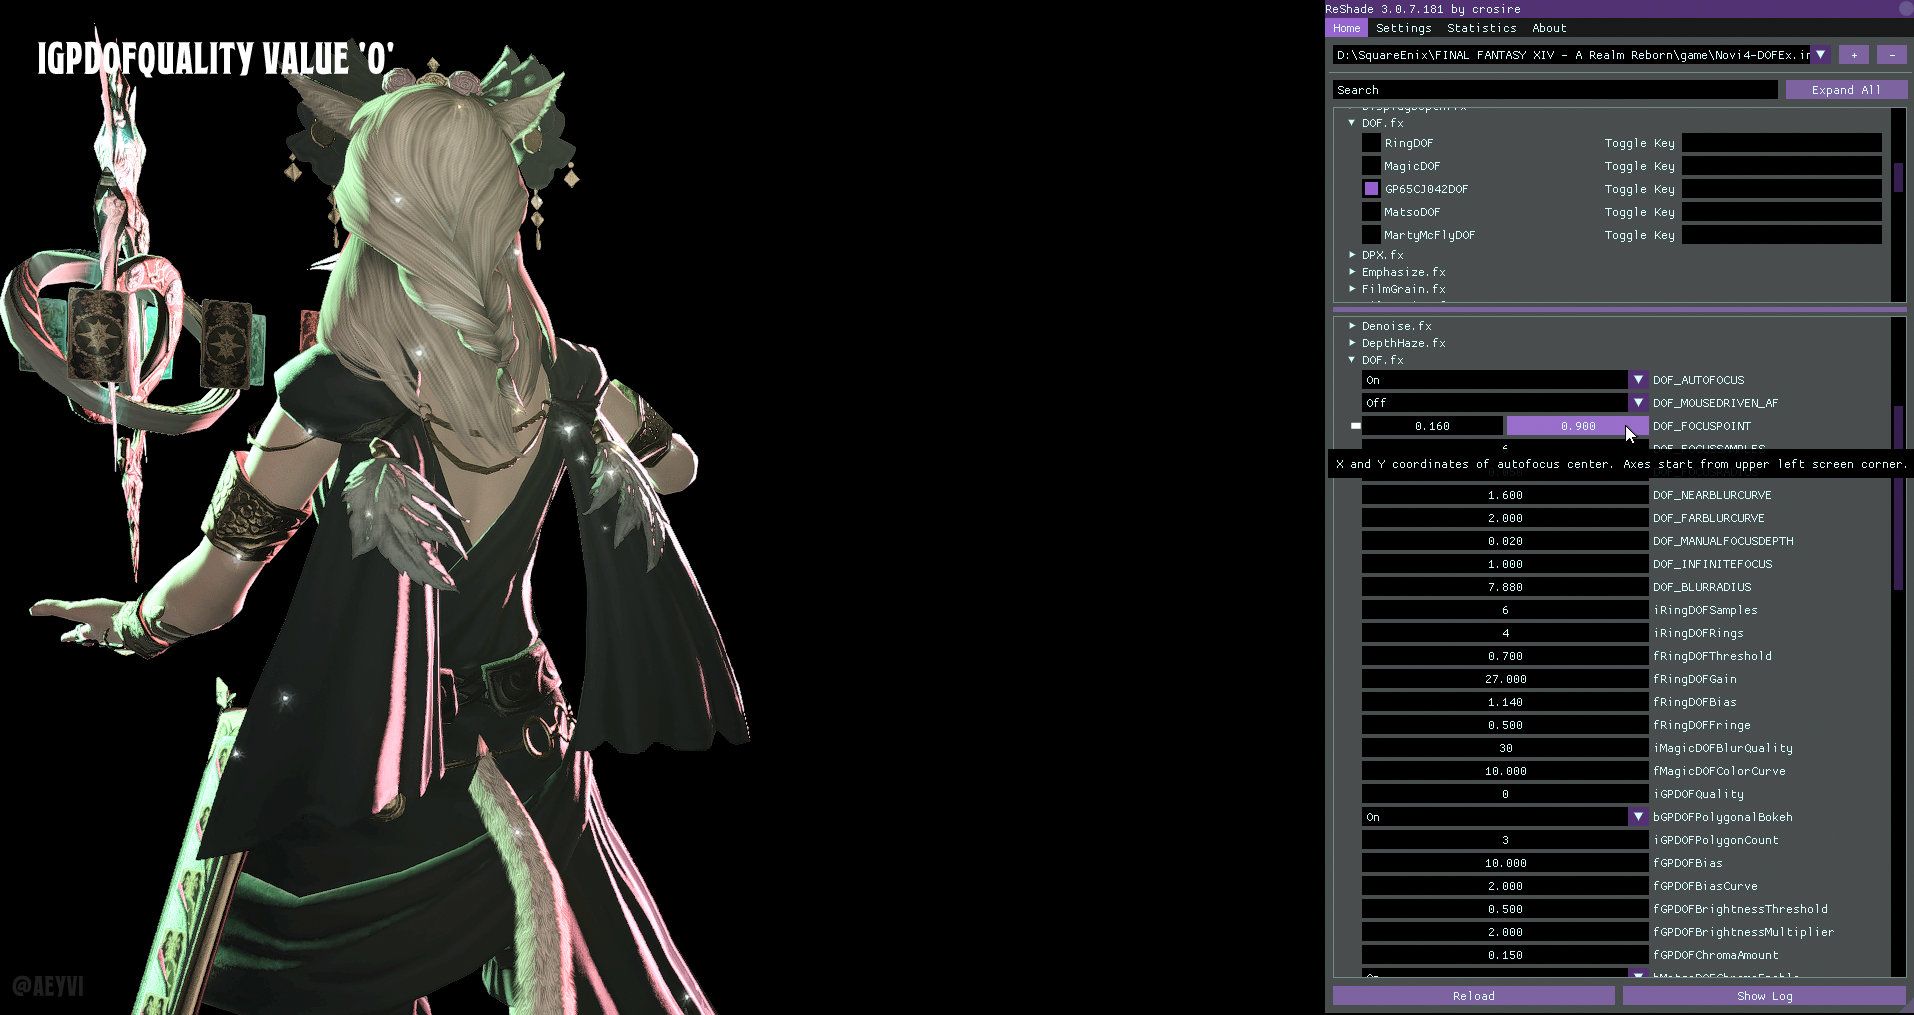
DOF_FOCUSPOINT
Tooltip: X and Y coordinates of the autofocus center. Axes start from upper left screen corner.
Works in conjunction with DOF_AUTOFOCUS to which it gives the X and Y coordinates of where the central focus point should be. For the example, I have set the focus to the location of Novi’s head area, I have included a copy of the ReShade values for reference (below). This is a good option for maintaining a centralized focus on a subject you know will be in a constant place on the screen. Further settings will expand from this area such as DOF_FOCUSRADIUS.
Note: This setting is more easily used with a visual guide/curtain in place – please see iGPDOFQuality below for more information. If you wish to use GP position for your focus point you will need to have the DoF shader GP65CJ042DOF toggled on instead of MatsoDOF, but you can switch back to Matso once you’ve positioned the focus.
DOF_FOCUSSAMPLES
Tooltip: Amount of samples around the focus point for smoother focal plane detection.
DOF_FOCUSRADIUS
Tooltip: Radius of samples around the focus point.
Manual focus point: Seems to invert the focus area. Works in conjunction with DOF_FOCUSSAMPLES. Increases and decreases the area of focus determined by the DOF_FOCUSPOINT.
Note: At this point, I have reverted settings to default, turned DOF_MOUSEDRIVEN_AF off.
DOF_NEARBLURCURVE
Tooltip: Curve of blur closer than focal plane. Higher means less blur.
Blur in front of the focus point, determined by the values in the DOF_FOCUSPOINT.
DOF_FARBLURCURVE
Tooltip: Curve of blur behind the focal plane. Higher means less blur.
Blur behind of the focus point, determined by the values in the DOF_FOCUSPOINT mentioned above, only as we have reset the values, we will be altering the focus point after setting the far blur.
I will explain these two together as they are practically the same but appear in the background and foreground (imagine a curtain of blur behind and in front of your character/focus). Check that your character or focal point is in focus, then drag the slider of DOF_FARBLURCURVE to align the ‘curtain’ of blur behind the subject at your preferred distance. For the DOF_NEARBLURCURVE I tilted my camera up and slowly decreased the value in the settings box. This setting can be a bit jumpy so I set it to a low value then manually typed in the number, increasing it by 0.100 each time.
DOF_MANUALFOCUSDEPTH
Tooltip: Depth of focal plane when autofocus is off. 0.0 means camera, 1.0 means infinite distance.
This setting only needs to be used if you choose to have the autofocus (DOF_AUTOFOCUS) turned off. When the AF is off, your image subject is no longer chosen by the focal point specified earlier in the settings. To have this focus on a relatively close subject you will have to use a low value, and once again, the slider is very sensitive in confined spaces (such as the studio I’m using) so manually entering (by double-clicking on the value) a low number around 0.040 should work. Combining manual focus, near and far curves and infinite focus is very useful for presets such those for weddings if you want a constant background blur in a given place.
DOF_INFINITEFOCUS
Tooltip: Distance at which depth is considered as infinite. 1.0 is standard. Low values only produce out of focus blur when focus object is very close to the camera. Recommended for gaming.
From what I can see this is for setting a focus area when both DOF_AUTOFOCUS and DOF_MOUSEDRIVEN_AF are both off. The higher the value, the more blurred the distance is.
DOF_BLURRADIUS
Tooltip: Maximal blur radius in pixels.
By far, one of my favorite settings! The higher the value, the more blur and loss of distinction you will have in the background. This is an important setting if you want to make stars and the particle effect more pronounced and glowy! Higher value means more blur and wider bokeh effect (yey!).
Basic DOF settings have been reset to default. Toggle OFF MatsoDoF and turn ON RingDoF.
RingDOF
iRingDOFSamples
Tooltip: Samples on the first ring. The other rings around have more samples.
Works in conjunction with iRingDOF Rings and explanation will continue below.
iRingDOFRings
Tooltip: Ring count.
To view the effects of the iRingDOFRings, put this and the iRingDOFSamples on a low-value number. You will see a very fragmented green and red halo effect (shown in the upper image). If you keep the iRingDOFRings on a low value and raise the iRingDOFSamples to the highest value (30) you will see that it smoothes out the effect but it’s still fragmented. If you then raise the value of iRingDOFRings to the highest value (8) you will see that the fragments lose all definition and the depth of field effect is very blurred and smooth with a green and red halo.
fRingDOFThreshhold
Tooltip: Threshold for bokeh brightening. Above this value, everything gets much brighter. 1.0 is a maximum value for LDR games like GTA:SA, higher values work only on HDR games like Skyrim etc.
The lower the value in this field, the brighter lit objects and the surrounding effect become. Works in conjunction with fRingDOFGain.
fRingDOFGain
Tooltip: Amount of brightening for pixels brighter than the threshold.
Works in conjunction with fRingDOFThreshold above. Using the threshold control at lower values, the fRingDOFGain can be used to further control the intensity of light being exaggerated by the threshold above.
fRingDOFBias
Tooltip: Bokeh bias.
Emphasizes the bokeh effect from any light source. Use with care as it can wield some pretty scary results in normal studio conditions!
fRingDOFFringe
Tooltip: Amount of chromatic aberration.
Increases the amount of red and green halo (displaced color) around the edges objects in the image.
Basic DOF settings have been reset to default. Toggle OFF RingDoF and turn ON MagicDOF.
MagicDOF
iMagicDOFBlurQuality
Tooltip: Blur quality as control value over tap count. Quality 15 produces 721 taps, impossible with other DOF shaders by far, most they can do is about 150.
Smoothes or fragments the depth of field effect. At lower values, the appearance is fragmented, at higher values, the effect is very smooth.
fMagicDOFColorCurve
Tooltip: DOF weighting curve.
High values produce a halo effect and brighten bokeh effects on subjects within the image. Lower values produce a more crisp definition around a subject that is the focus of the picture, as well as those in the rest of the image (this setting may change effect depending on what your DOF_BLURRADIUS), is set to.
Basic DOF settings have been reset to default. Toggle OFF Magic DOF and turn ON GP65CJ042DOF.
GP65CJ042DOF
iGPDOFQuality
Tooltip: 0= only slight gaussian far blur but no bokeh. 1-7 bokeh blur, higher means a better quality of blur but less FPS.
This setting is so useful to place your DOF_FOCUSPOINT (mentioned above in the ReShade Basic DoF Settings). At a value of ‘0’ the shader creates a black curtain that shows you where your depth of field focus. If you scroll back up to DOF_FOCUSPOINT in your ReShade and modify some of the numbers, the curtain will be placed in the corresponding coordinates. This helps me align my manual focus point.
bGPDOFPolygonalBokeh
Tooltip: Enables polygonal bokeh shape, e.g. POLYGON_NUM 5 means more pentagonal bokeh shape. Setting this value to false results in circular bokeh shape.
On/off switch for effect.
iGPDOFPolygonalCount
Tooltip: Controls the number of polygons for polygonal bokeh shape. 3 = triangular, 4 = square, 5 = pentagonal etc.
To be able to display this shader effect properly I have firstly turned on DOF_MOUSEDRIVEN_AF so that the mouse cursor will choose my focal point, and also set the DOF_BLURRADIUS to 17.300 to emphasize the bokeh shaping. These two settings are near the top of the general DOF.FX options (covered above). The GPose ‘Particle’ effect will also be used for this example along with lower lighting conditions.
This setting basically allows you to change the shape of the bokeh effect.
fGPDOFBias
Tooltip: Shifts bokeh weighting to bokeh shape edge. Set to 0 for even bright bokeh shapes (shown above), raise it for darker bokeh shapes in the center and brighter on the edge.
Provides bokeh shape definition. Allows you to change the bokeh shape from hollow (just the outline) to a filled glowing shape.
fGPDOFBiasCurve
Tooltip: Power of bokeh bias. Raise for more defined bokeh outlining on bokeh shape edge.
fGPDOFBrightnessThreshold
Tooltip: Threshold for bokeh brightening. Above this value, everything gets much brighter. 1.0 is a maximum value for LDR games like GTASA, higher values work only on HDR games like Skyrim etc.
fGPDOFBrightnessMultiplier
Tooltip: Amount of brightening for pixels brighter than fGPDOFBrightnessThreshold.
Additional brightening for the bokeh effect.
fGPDOFChromaAmount
Tooltip: Amount of color shifting applied on blurred areas.
Basic DOF settings have been reset to default. Toggle GP65CJ042DOF and turn ON MatsoDOF.
MatsoDOF
bMatsoDOFChromaEnable
Tooltip: Enables chromatic aberration. (For definition see ‘Terms’ above).
On/off switch for effect.
fMatsoDOFChromaPow
Tooltip: Amount of chromatic aberration color shifting.
Color distortion within the image creating RBG shifts of the original object.
fMatsoDOFBokehCurve
Tooltip: Bokeh curve
iMatsoDOFBokehQuality
Tooltip: Blur quality as control value over tap count.
Sharpens/disperses bokeh light sources at low values, creating pretty little flower patterns!
fMatsoBokehAngle
Tooltip: Rotation angle of bokeh shape.
Possibly the most fun setting out of this bunch, you can effectively turn the sparkles into bokeh glowy rain! I’ve changed the value to 78.000 for this example.
Basic DOF settings have been reset to default. Toggle OFF MatsoDOF and toggle ON MartyMcFlyDOF.
MartyMcFlyDOF
This is, by far, the most extensive shader of the those discussed in this article. For most images in this section, I have used a focus point of 0.160/0.900 with autofocus on and mouse driven AF off (though under usual circumstances I always have mouse driven autofocus on). One of the reasons I enjoy this shader so much is because you have many on/off switches so in effect it feels a little safer. The other shaders often have settings that impact all other settings, so if you make a mistake and forget what the default value was, it can be annoying and break filter. With the MartyMcFlyDOF you can simply turn the setting off if you don’t wish them to impact on the other settings. I feel this allows you more freedom to experiment without instantly breaking the whole thing (as I’ve done many times)! The general DoF settings still impact on this shader. Many of these settings are best displayed using the ‘Particle’ effect from the GPose settings in low light.
iADOF_ShapeQuality
Tooltip: Quality level of DOF shape. Higher means more offsets are taken, cleaner shape but also less performance. Compilation time stays same.
As mentioned in the tooltip the higher value can be very performance intensive. My first instinct was to set it to 255 and I barely scraped 1fps! At a low value the effect disperses the particle light effects creating tiny falling flowers (as seen above but larger).
fADOF_ShapeRotation
Tooltip: Static rotation of bokeh shape.
bADOF_RotAnimationEnable
Tooltip: Enables constant shape rotation in time.
On/off switch for effect. This setting enables the little bokeh stars to rotate on the spot or as they are moving. It’s a beautiful effect but not very useful for static screenshots.
fADOF_RotAnimationSpeed
The speed of shape rotation. Negative numbers change direction.
bADOF_ShapeCurvatureEnable
Tooltip: Bends edges of polygonal shape outwards (or inwards). Circular shape best with vertices >7.
On/off switch for effect.
fADOF_ShapeCurvatureAmount
Tooltip: Amount of edge bending. 1.0 results in a circular shape. Values below 0 produce star-like shapes.
bADOF_ShapeApertureEnable
Tooltip: Enables deformation of bokeh shape into a swirl-like aperture. You will recognize it when you try it out. Best with big bokeh shapes.
On/off switch for effect.
fADOF_ShapeApertureAmount
Tooltip: Amount of deformation. Negative values mirror the effect.
This effect is advised for large bokeh effects though in the example image you will be able to see the effect anyway. The setting effectively swirls the bokeh shape and makes it look like tiny swirly star shapes.
bADOF_ShapeAnamorphEnable
Tooltip: Lessens horizontal width of the shape to simulate anamorphic bokeh shape seen in movies.
On/off switch for effect.
fADOF_ShapeAnamorphRatio
Tooltip: Horizontal width factor. 1.0 means 100% width, 0.0 means 0% width (bokeh shape will be vertical line).
Ever wanted to make pixel rain? Now you can! By having particle effect, the bADOF_ShapeTextureAmount on 1 and switching this setting to 0!
bADOF_ShapeDistortEnable
Tooltip: Deforms bokeh shape at screen borders to simulate lens distortion. Bokeh shapes at screen edges look like an egg.
On/off switch for effect.
fADOF_ShapeDistortAmount
Tooltip: Amount of deformation.
This setting effectively distorts the bokeh effect by slightly squishing it horizontally.
bADOF_ShapeDiffusionEnable
Tooltip: Enables some fuzziness of bokeh shape, makes it less clearly defined.
On/off switch for effect.
fADOF_ShapeDiffusionAmount
Tooltip: Amount of shape diffusion. High values look like the bokeh shape exploded.
Can produce a frozen glass-like effect for your background blur.
bADOF_ShapeWeightEnable
Tooltip: Enables bokeh shape weight bias and shifts color to the shape borders.
On/off switch for effect. Gives the appearance that the bokeh effect is hollowed out, effectively darkens the internal area of shapes and subjects. Be careful with the settings as they are quite sensitive and you could end up looking like someone has drawn thick charcoal lines around objects in your image.
fADOF_ShapeWeightCurve
Tooltip: Curve of shape weight bias.
Lower value input means that the darkness around objects becomes thicker.
fADOF_ShapeWeightAmount
Tooltip: Amount of shape weight bias.
Spreads the darkness effect from ‘internal’ shadow (displayed in the first image above) to edge shadow. This is perhaps not the best environment to display this setting so I may review this at a later date.
fADOF_BokehCurve
Tooltip: Bokeh factor. Higher values produce more defined bokeh shapes for separated bright spots.
A higher value in this box will increase the intensity of any light source producing the bokeh effect within the image. This is a great setting if you wish to emphasize the stars.
bADOF_ShapeChromaEnable
Tooltip: Enables chromatic aberration at bokeh shape borders. This means 3 times more samples = less performance.
On/off switch for effect.
iADOF_ShapeChromaMode
Tooltip: Switches through the possible R G B shifts (6 modes).
A selection of color combinations to choose from, for this screenshot below I have kept the bADOF_ShapeTextureAmount on 1 and used Mode 4 with the GPose ‘Particle’ effect running.
fADOF_ShapeChromaAmount
Tooltip: Amount of color shifting.
A higher the value in this setting, the more stretched out the ‘stars’ become.
bADOF_ImageChromaEnable
Tooltip: Enables image chromatic aberration at screen corners. This one is way more complex than the shape chroma (and any other chroma on the web).
On/off switch for effect.
iADOF_ImageChromaHues
Tooltip: Amount of samples through the light spectrum to get a smooth gradient.
Increases the number of colors included in the ‘chroma’ effect. Higher values will create a rainbow halo effect and also an almost warped-like distortion around the edges of the image.
fADOF_ImageChromaCurve
Tooltip: Image chromatic aberration curve. Higher means less chroma at screen center areas.
Slight distortion of the chromatic aberration effect. Lower values result in more blur.
fADOF_ImageChromaAmount
Tooltip: Linearly (in a straight line) increases image chromatic aberration amount.
fADOF_ImageSmootheningAmount
Tooltip: Blur multiplicator of box blur after bokeh to smoothen shape. Box blur is better than gaussian.
Makes the depth of field effect even more blurry or softer in appearance, so this setting is fantastic to use in conjunction with a high DOF_BLURRADIUS (mentioned above in the Reshade basic DoF settings) if you want to create additional blur behind your focus point.
The following settings were listed in the master file, however these do not (yet) appear in my version of ReShade 3.0 nor in a friends copy of 3.1 but I’ve chosen to put them in here just in case!
bADOF_ShapeTextureEnable
Tooltip: Enables the use of a texture overlay. Quite some performance drop.
On/off switch for effect.
iADOF_ShapeTextureSize
Tooltip: Higher texture size means less performance. Higher quality integers better work with detailed shape textures. Uneven numbers recommended because even size textures have no center pixel.
iADOF_ShapeVertices
Tooltip: Polygon count of bokeh shape. 4 = square, 5 = pentagon, 6 = hexagon and so on.
Changes the shape of the bokeh effect from light sources.
bADOF_ImageGrainEnable
Tooltip: Enables some fuzziness in blurred areas. The more out of focus, the more grain.
On/off switch for effect.
fADOF_ImageGrainCurve
Tooltip: Curve of Image Grain distribution. Higher values lessen grain in moderately blurred areas.
fADOF_ImageGrainAmount
Tooltip: Linearly multiplies the amount of Image Grain applied.
fADOF_ImageGrainScale
Tooltip: Grain texture scale. Low values produce more coarse Noise.
Shader Credits: Marty McFly, Matso (Matso DOF), PetkaGtA, gp65cj042.
ReShade Credit:
Crosire
Keep in mind!
If your DoF settings ever break completely (this has happened to me several times) copy the [DOF.fx] settings from a ‘plain’ preset .ini (located in your /game folder) and replace that section to have everything back to default.
Disclaimer!
I am honestly no expert in ReShade. This guide is based on my own understanding of each setting, so I apologize if anything written here is incorrect or misleading. Should there be any inaccuracies or additions you would like me to review please drop me an email through the screenograpic website contact page or drop a message down below (or on Twitter). I am still learning and happy to take on constructive feedback. Thank you in advance!
Some of the settings shown here may differ depending on the ‘artificial zoom’ from the GPose camera, also ReShade version. There is a such a huge range of variables within the settings, so the depth of field values will need to be tailored to your specific requirements. I’ve tried my best to briefly summarize the settings for each shader (where necessary) but sadly I cannot cater for every eventuality. I am aware that I have missed ‘LightDOF‘ from this guide, it will be added at a later stage.
In the future, I hope to show a range of ‘how to make your own’ filters for specific environments, but there’s a lot of photographic and Screenographic theory to cover in more depth first, including the ‘Bloom & Lens Flare’ section, color theory, and framing!
For anyone wishing to test these settings in the apartment studio shown throughout this guide, the location of my apartment is in Shirogane – Ward 16 – Apartment 2 – Odin (Chaos data center). The door will be open for anyone to use unless I’m working in it!
Related Articles:
If you managed to get through all of this without your brain melting, congratulations! I truly hope something here has been useful to someone. I wish you the best until I hopefully see you once more in the next edition!

Related: Art of Eorzea
Comments
Post a Comment